iPhone & iPad Calendar Spam
If you’ve been getting invitations to buy stuff on your iPhone or iPad calendar in the last few days, here’s how to stop it and prevent it happening in future. It’s all because of the way iCloud scans emails and turns them into Calendar invites automatically – and spammers are using this exploit to try and get your attention. It’s just plain annoying so here’s how to stop it and get rid of any calendar entries you already have – because declining them will just make the problem worse: the spammers will know it reached you and before long you’ll have even more pesky invites winging their way to your lovely iDevice.
Part 1: Stop it happening.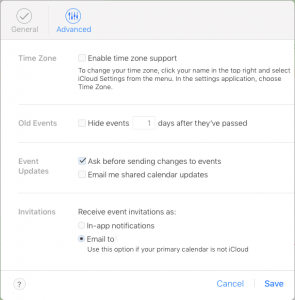
- Go to iCloud.com and click on the Calendar.
- In the bottom left of the Calendar window, you’ll see a settings cog. Click it.
- Click Advanced at the top of the settings screen. It’s next to General.
- In the Invitations section, change the ‘event notifications’ from ‘in-app notifications’ to ‘Email to youremail@yourdomain.com’. You’ll now have to look out for calendar email invites in your email, rather than letting iOS do it for you.
Part 2: Remove existing calendar entries.
If you’ve got any spam entries & you’d like to get rid of them without letting the spammer know you’re on to them, you’ll need to create a new calendar, so you can copy all your spammy invites to. You then simply delete the calendar and no-one will get notified about all the events you zapped.
- On your iOS device, go to your Calendar.
- Create a new Calendar by pressing ‘Calendars’ at the bottom of the screen.
- Press Edit (top left of the screen)
- Press ‘Add Calendar…’
- Give your Spam Calendar a name. Something imaginative, like ‘Spam Calendar’
- Now go to the spam event in your main Calendar, tap Edit, then change the Calendar to your new ‘Spam Calendar’
- Repeat for all dodgy looking spam events (apart from boring meeting invites)
- Now go back to the Spam Calendar (by pressing “Calendars’ at the bottom of the screen), press the ‘i’ on the right hand side next to your ‘Spam Calendar’ and then at the bottom of the screen, press ‘Delete Calendar’